We'll Get You More Online Sales
By Avoiding the Mistakes 99% of Companies Make With Their Websites
Learn More Contact UsThe Next Generation
Online Sales System
OUR GOAL IS SIMPLE — TO COMMUNICATE YOUR OFFERS TO A TARGETED AUDIENCE OF POTENTIAL BUYERS
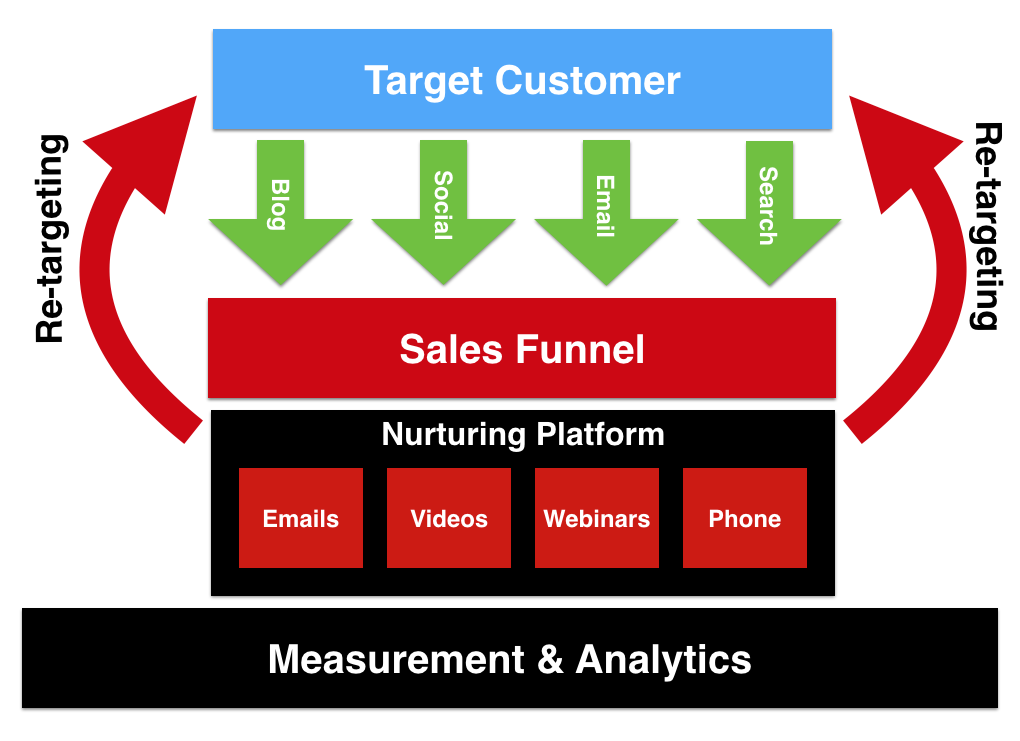
Our Solution Connects Your Company With Prospective Customers
So You Can Focus On Managing Your Business
A Unique Combination
Business management expertise combined with advanced online marketing allows us to create crystal clear messaging and provide targeted awareness which means lower custom acquisition costs and higher customer value for your business.
Maximum ROI
We rely on advanced online marketing and measurement techniques to reach qualified prospects for your business to maximize your ROI. Depending on your objectives, different customer profiles can be targeted through specific channels.
What We Do
Every facet of direct response online marketing to get you leads and customers with the highest measurable ROI
Business Consulting
- Business modeling
- Sales funnel planning
- Offer development
- Campaign strategy
- Project planning and management
Sales Funnel Optimization
- Sales letters and videos
- Landing pages
- Autoresponder integration
- Follow-up emails
- Payment integration
- Membership sites
- A/B testing
- Measurement and analytics
Lead Generation
- Traffic planning
- Traffic management
- Content planning
- Blogging
- Social media
- Email campaigns
- Webinars
Don’t Take Our Word For It
"We’ve used numerous marketing firms and Accelerated Online consistently delivers value in its informed communication of our business plan to a relevant and qualified target marketing. Their mastery of online marketing connects us with new leads every day.”
John H., a client company CEO
“Knowing we can rely on Accelerated Online to be proactive and capably deliver professional and comprehensive online lead generation allows us to stay focused on our business.”
Sean C., a client company CEO
“Their grasp of online lead generation is hugely helpful to us in growing our customer base. Their ability to reach our target market along with their ability to produce high converting sales funnels makes them very valuable to our business.”
John P., a client company CEO
Frequently Asked Questions
How are you more valuable than other online marketing firms?
We represent you professionally to your target customers with an informed understanding of your business and an ability to engage at a level of depth not typical to the field because of our former lives in product marketing and product management.
Our online marketing experience is unique because we use the same techniques to reach our target market as we use to reach our clients' target markets.
What motivates you to succeed for your clients?
Most of all it’s the recognition that reputation is our primary asset and that commitment to our client success is the most effective way to grow our business.
We get gratification out of collaborating on strategy and teaming to execute and achieve our clients' business objectives. Simply stated, we love the process of online marketing and business development which translates to committed execution and better value.
How do you save us money while delivering the best service available?
Half the battle is knowing how NOT to waste money which we have learned through years of experience - sometimes the hard way. What we've emerged with is a firm grasp on how best to deploy resources that allows you to maximize your ROI.
We know how to help businesses identify the online marketing challenges they actually have instead of the ones they think they have which results in better resource allocation and results.
Who are you?
Our principal is a former product marketing and management leader who is an online marketing veteran. Combined with Fortune 100 online marketing knowledge, we know how to apply the right processes to connect your business with your ideal customer.
What is the cost of for your services?
Our fees are competitive with the industry, but we feel offer greater value than other vendors who have narrower online marketing experience, less commitment to service, and who will only direct you in their area of expertise.
Contact Us
Let's talk about your company
Complete the form below to contact us.